Vintage Ornament Glyph Pack: A Designer’s Honest Take for Real Embroidery Use
First Impressions: Ornate, Bold, and Full of Vintage Charm
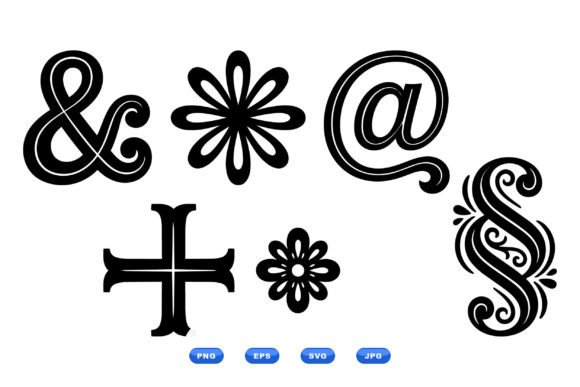
Opening the Vintage Ornament Glyph Pack, I was immediately struck by the strong visual presence of these glyphs. They’re bold, black, and stylized—like the kind of symbols you’d see etched into old letterpress prints or engraved in antique stationery. The ampersand, at sign, floral asterisk, and decorative cross all carry a consistent theme: ornate, slightly mysterious, and full of that classic typographic flair that’s hard to replicate with modern fonts.
As someone who often works with vintage aesthetics for boutique brands and personalized gifts, this pack feels like a solid addition to my design toolkit. It's not just decorative—it tells a story. The glyphs are designed as vector silhouettes, which makes them scalable and clean, but I was curious how they’d translate into actual embroidery stitches.
Testing in Real Life: From Sweatshirts to Tote Bags
I decided to test the glyphs on a few real-world items I frequently make: a custom embroidered tote bag, a baby onesie, and a men’s sweatshirt. The goal was to see how the design would hold up across different fabric textures, thicknesses, and intended uses.
Starting with the tote bag, which is a common product for Etsy sellers and craft fairs, I used a medium-weight cotton canvas. The bold nature of the glyphs held up beautifully. The fill stitches were dense enough to maintain the silhouette without bleeding through the fabric. It added a touch of sophistication without overpowering the minimalist tote design.
On the baby onesie, I chose the floral asterisk as a subtle accent near the shoulder seam. It stitched cleanly, even on the thinner cotton knit. I was cautious about using it on such a delicate item, but the design’s simplicity allowed it to blend in nicely without feeling too heavy or bulky.
The sweatshirt test was the most revealing. I used the ampersand glyph as a standalone design on the chest. The thick fabric handled the design well, and the contrast between the dark thread and light fabric made the glyph pop. It gave the sweatshirt a boutique-level finish that customers often expect for premium handmade items.
Where to Use with Care: Fabric, Size, and Placement Matter
While the Vintage Ornament Glyph Pack performed well in many cases, there are definitely scenarios where caution is needed. For instance, trying to stitch these glyphs on stretchy fabric like jersey knit without proper stabilizer can lead to distortion. I noticed slight pulling on a t-shirt test, which made the glyph lose some of its sharpness.
Dark fabrics are another consideration. Since the design is black, it can disappear on black or very dark materials. I’d recommend testing with a white underlay or using a contrasting thread color if you're aiming for visibility. Also, on curved surfaces like caps, the corners of the glyph can get lost in the contour unless you adjust the placement carefully.
Smaller hoop sizes are tricky. These glyphs are detailed enough that shrinking them down too much can cause the satin stitches to merge, creating a blob instead of a defined symbol. I wouldn’t go below a 3x3 hoop unless you're using a simplified version of the design or manually editing the file for clarity.
Impact on Product Value and Customer Appeal
From a business standpoint, these glyphs can elevate your product’s perceived value. When used thoughtfully, they add a touch of elegance and craftsmanship that handmade buyers look for—especially in personalized gifts and boutique apparel. I’ve found that customers respond well to subtle vintage touches like these, especially when they’re not overused.
For Etsy sellers and small shop owners, the Vintage Ornament Glyph Pack offers a versatile asset that can be used across multiple product lines. Whether it's a wedding handkerchief, a holiday ornament, or a custom patch, these glyphs work as standalone accents or as part of a larger design layout.
From a branding perspective, they also help maintain consistency. If you're building a vintage-themed brand or offering retro-inspired embroidery, these glyphs can become part of your signature style—helping your work stand out and be recognized more easily.
Designer Notes: Practical Tips Before You Stitch
- Test on scrap fabric before stitching your final product, especially if you’re using a new fabric type or hoop size.
- Check thread color contrast—especially on dark or patterned materials. A white or light underlay can help maintain visibility.
- Review stitch density to avoid puckering on thin or stretchy fabrics. Adjust if necessary.
- Confirm hoop size compatibility with your machine before stitching. Don’t force a design into a smaller hoop than recommended.
- Inspect small details like inner corners or thin lines to ensure they stitch cleanly.
- Test in black and white mockups first to see how the glyph will look in a minimalist context.
- Use proper stabilizer—especially for textured or stretchy materials.
- Verify licensing if you plan to sell finished items or digital embroidery files that include the glyph pack.
Final Thoughts: A Solid Addition for Vintage-Inspired Embroidery
Overall, the Vintage Ornament Glyph Pack is a well-designed, flexible set of symbols that can enhance a wide variety of embroidery projects. While it’s not a one-size-fits-all solution—especially for smaller or more delicate items—it offers a strong visual impact that translates well across different product types.
Whether you're a craft business owner, a digital product seller, or a hobbyist looking to elevate your embroidery, this pack is worth considering. It’s not just a design asset—it’s a tool that can help you tell a story through your work, one stitch at a time.